Showing posts with label Salt. Show all posts

Jun 17, 2014

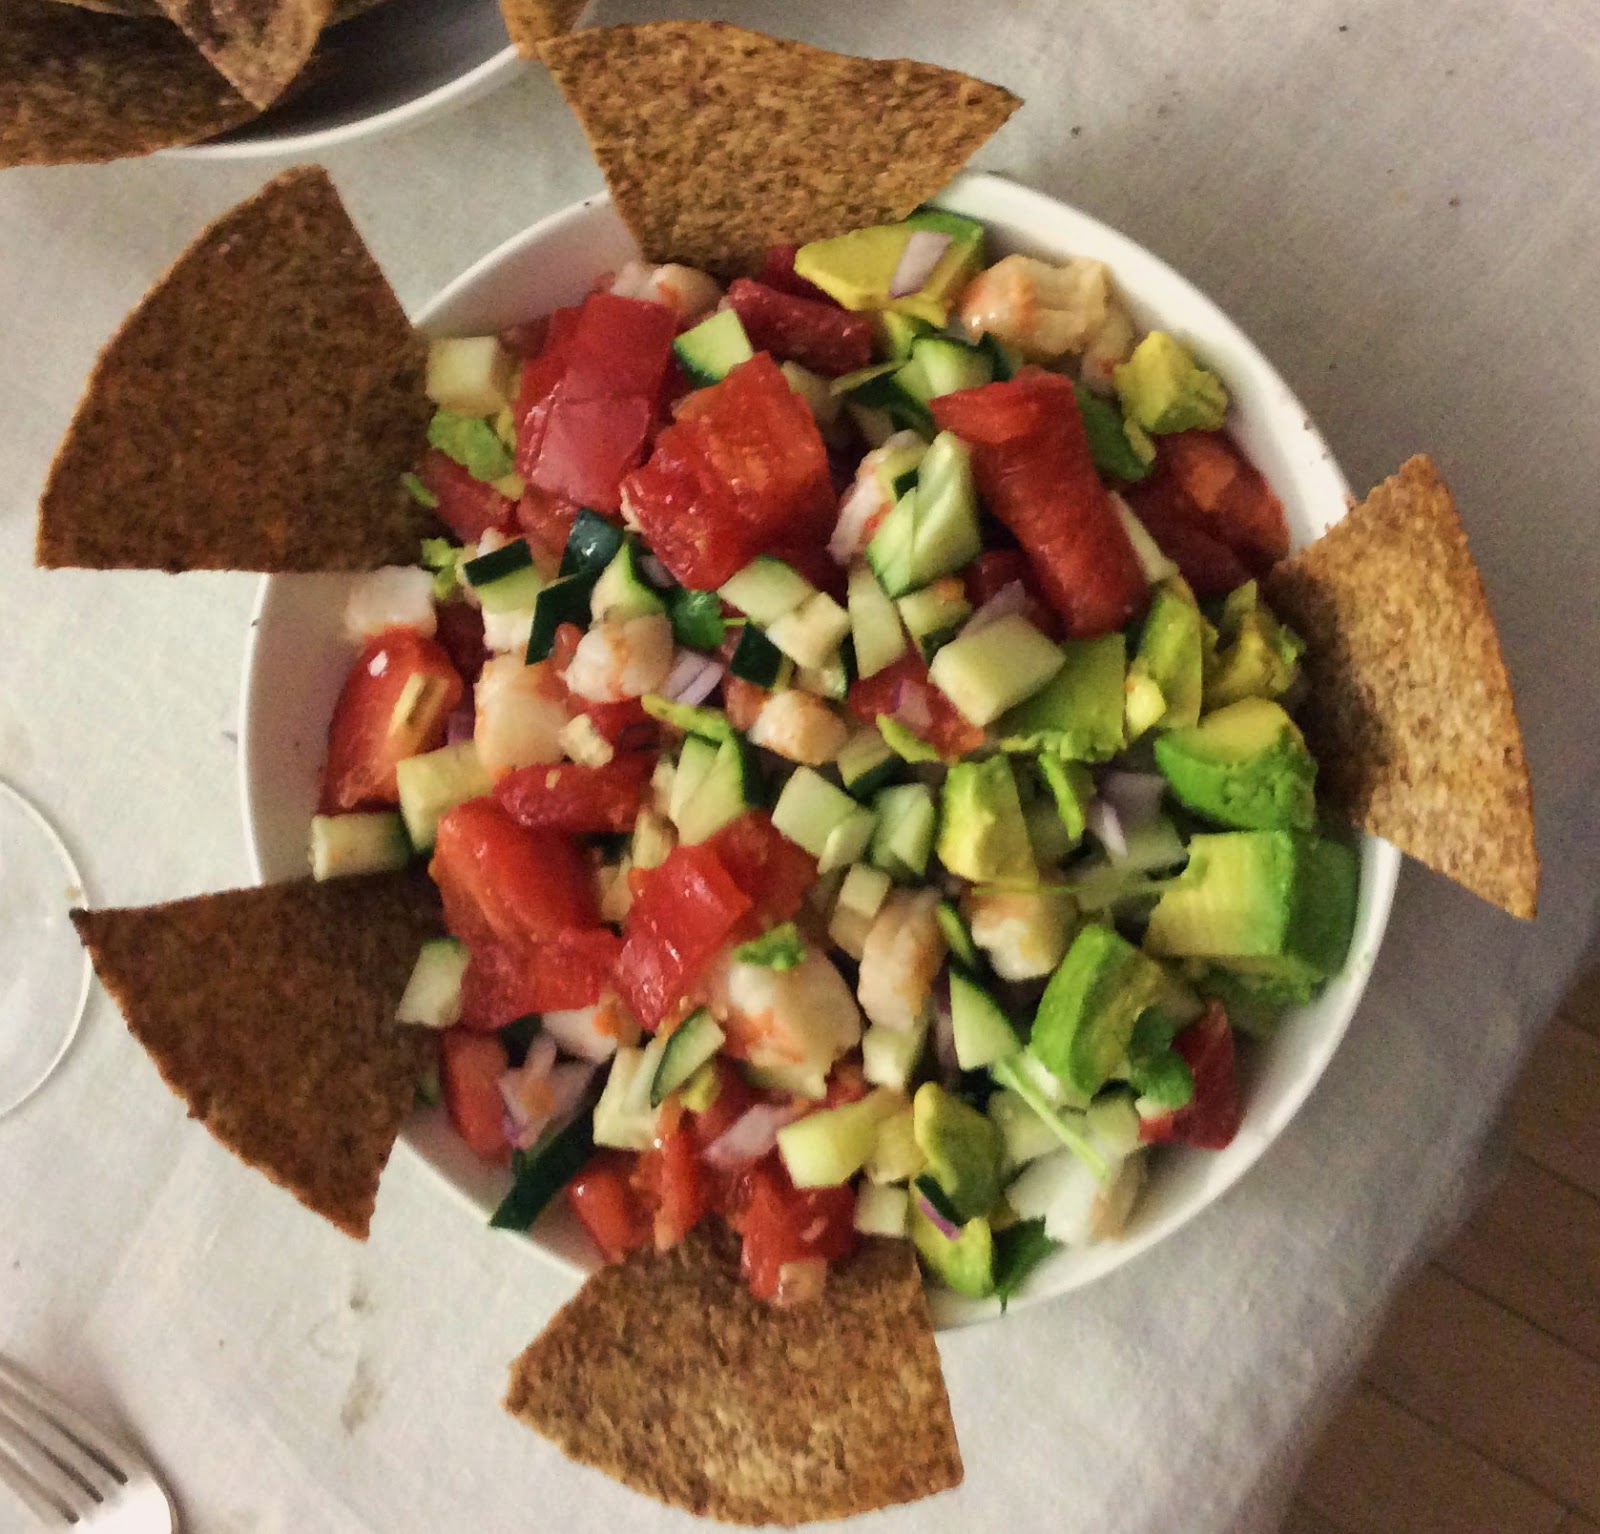
Lime Shrimp (or Tofu) "Ceviche" with Masala-Dusted Tortilla Chips


Happy Summer! I know -- we still have a few weeks astronomically-speaking but I just can't wait! And with temperatures in the 80s and Memorial Day behind us, I'll ignore the ever-present rain, slip on my sandals, open all the windows and start making summer meals!

Ceviche is, to me, a quintessential warm-weather dish -- barely-cooked light, refreshing fish or seafood mixed with refreshing vegetables and lime juice, what's not to love? And this was a perfect excuse to showcase those first heirloom tomatoes of the season. So why, you may ask, is this a "ceviche" and not just a ceviche? Well, although I have no problem eating raw fish, seafood and even beef in restaurants, I'm always a little nervous about making it myself. So I boiled my shrimp for not-quite two minutes before chilling them and marinating them with lime juice and other goodies.

For the Vegetarian, I used new (to us) tofu cutlets: organic tofu that's already been cooked so you just have to cut it up and either heat it up or eat it cold. Very convenient! 


The one note I'll make with this ceviche is to make sure you cut everything up as small as you can. That makes it easier to scoop up and eat with these homemade tortilla chips, see. Oh and do use fresh lime juice. I'm a big fan of convenience but, in this case, bottled lime juice just won't cut it. I guess that's two notes. Ah, well. Bon appetit!


Lime Shirmp (or Tofu) Ceviche
Masala-Dusted Tortilla Chips
First, bring a pot of water to a boil and cook shrimp for 1-2 minutes, until they just turn pink. Drain and let cool, then chop them into pieces small enough to be scooped up with a tortilla chip. If using tofu, just cut up into small pieces and pat dry.

In a large bowl, coming lime juice and red onion. Stir in shrimp or tofu. Cover and refrigerate 1 hour.

After an hour, stir in cucumber, tomato, avocado and cilantro. Serve with tortilla chips (homemade are best).

For Masala-Dusted Tortilla Chips:

Preheat oven to 350. Lay a tortilla on a cutting board. Brush one side with olive oil. Top with another tortilla and brush it with olive oil as well. Repeat with remaining tortillas. Cut into 8 equal pieces. (Since they're all stacked one on top of the other, this becomes really easy as you can cut them all at once.)

Line a baking sheet with aluminum foil and lightly oil it. Place tortilla pieces on it in a single layer, oiled side up. You may need as many as 3 baking sheets or to cook these in batches.

Sprinkle with salt and garam masala. Bake for 10 minutes, until crispy. Enjoy!

Links:

Mar 25, 2014

Rigatoni with Garlicky White Beans


So here we are several days into spring and I'm still cooking and craving winter foods. And why is that, you may very well ask? Because Mother Nature has decided to ignore the astronomical calendar and instead snow is predicted tonight. That's right, snow. At the end of March.

But instead of whining (or, at least to distract me from it), I've gotten back into the kitchen and revisited a delicious pasta and beans dish I adapted from Smitten Kitchen two months ago but never posted. This was the perfect occasion to remake it, perfect the pictures and write it up! This recipe is hearty and infinitely adaptable. You can use virtually any kind of pasta and any kind of bean. It's a great change of pace from tomato sauces and, even though it's vegan, it's definitely stick-to-your-ribs food. You can serve it with garlic-rosemary oil (instructions below), as we did the first night, but it's also delicious as is, reheated (or not) for leftovers. You can also swirl in a spoonful of pesto, homemade or from a jar. If you are eating peppers, I recommend a dash of red pepper flakes. And if you do want some meat, cook up an Italian sausage (sweet or spicy depending on your mood), chop it up and mix it in with the pasta. Leftovers also make a phenomenal soup. Bon appetit!

Pasta with Garlicky White Beans
adapted from Smitten Kitchen

In a food processor, chop together onion, carrots, celery, 5 cloves garlic, parsley and pepper. (Be careful -- it goes quickly from chopped to pureed.). In a heavy pot over medium heat, heat 1/4 cup olive oil. Add chopped vegetables and sprinkle with salt. Cook 10 minutes, stirring occasionally so they color but don't burn or stick to the bottom of the pot. Add tomato paste, stir, and cook 1 minute. Add water or vegetable broth and scrape up any browned bits from the bottom of the pot. Simmer 5 minutes.

Add beans and 2 other cups water or vegetable broth. Simmer 15 minutes.

While beans cook, boil water and cook rigatoni according to package directions. Drain well, reserving 1/2 cup cooking liquid.

Once beans are cooked and tasty, take out 1 cup and add it, along with 1/2 cup pasta cooking liquid, into food processor (no need to clean it in between uses!). Puree, then stir back into beans along with rigatoni. Mix well.

While waiting for everything to come together, remove rosemary leaves from stalk and crush remaining 3 cloves garlic. In a small saucepan over medium-low heat, heat final 1/4 cup olive oil. Add garlic and rosemary and cook just until starting to color, 2 minutes. Pour hot oil over rigatoni in bowls. Enjoy!

Links:

Mar 21, 2014

Pickled Daikon Radish with Onions


Like many Jewish New Yorkers, I grew up eating pickles. I only liked the sour ones and I would refuse any half-sour or (G-d forbid) raw cucumbers. As I put it, I only liked them when they were all grown up! And the only pickles I liked were pickled cucumbers. While my parents got excited about gourmet blends including dill tomatoes, I scoffed and picked out the pickled cucumbers (or "real pickles" as I haughtily called them).

Well, tastes change over time and now I eat cucumbers at all stages of their lives. I also got introduced to other pickled vegetables, first at Korean restaurants and then, as I explored Body Ecology Diet's recommendations of cultured vegetables. I discovered that lots of vegetables were delicious pickled -- greens, carrots and even beets. (I still think pickled tomatoes are a waste of good tomatoes, though.) And, as my tastes became more refined, I found that I liked a little kick in my pickles, be it from garlic, ginger or, as in this recipe, onions.

So when I stumbled across a recipe in Nourishing Traditions for pickled daikon radish, I was intrigued. Radishes often have a bite all their own (although daikon is much more mild). And, while I had never made pickles myself, this way I could control everything that went into them. And we all know how much I enjoy doing that! I ended up adapting this from a recipe from Vegetarian Times. The original called for jalapenos but, since I'm avoiding peppers, I used onions instead for my "kick". These are sweet and fairly mild -- a great addition to a salad or sandwich or, as I did for lunch today, served alongside some fish and fresh tomatoes. Bon appetit!

Pickled Daikon Radish with Onions
Place daikon, carrots, onions and sea salt in a large bowl. Toss well and let sit 1 hour to draw out excess moisture. Drain well, then transfer to jar(s), packing down well. In a small saucepan over high heat, bring vinegar and lucuma to a boil. Whisk until lucuma is completely dissolved (it has a tendency to clump so whisk or stir to dissolve). Pour liquid over vegetable mixture in jar(s). Refrigerate at least 3 hours. You can store these in the refrigerator for quite a while. Enjoy!

Links:

Feb 20, 2014

Potato and Celeriac Puree


Nutritionists often tell us to eat as many different colors as we can. And on a good day, I can probably get three or four onto my plate -- white, green, pink and red. But there are some colors that we almost never get such as my favorite, purple.

That all changed the other night with this delectable puree. Yes, it's another celeriac (white) recipe but this time I mixed the celeriac with purple potatoes. The celeriac blended right in with the potatoes and we wound up with this exquisite meal, served alongside baked eggplant (for the vegetarian) and chicken (for the omnivore). Leftovers we reheated in a 350F oven for 20 minutes and served under buffalo steak (for the omnivore) and portobello mushrooms (for the vegetarian). A great take on a more traditional (and less colorful) meal!

A note about dairy: as many of you know, I have been avoiding dairy (to the best of my cheese-addicted abilities) for almost a year. I recently re-introduced clarified butter (ghee) into my diet and I love it. It brought an especially rich quality to the puree and mixed perfectly with the rice milk. If you're avoiding dairy of all sorts, feel free to substitute coconut oil instead.

This puree ended up a little chunky (which I love -- anything too silky smooth bores me about halfway through). If, however, you prefer a smoother puree, mash the potatoes and celeriac in the food processor instead of by hand. Bon appetit!

Potato and Celeriac Puree

Put potatoes into a large pot and cover with cold water (make sure the pot is big enough to fit the celeriac too and that you put in enough water to cover both). Add kosher salt. Bring pot to a boil over high heat, covered, and cook 10 minutes. Add celeriac and boil another 10 minutes. Drain and return to pot.

Meanwhile, in a small saucepan, bring rice milk to a boil. Using a potato masher, mash potatoes and celeriac as smoothly as desired (you could also do this in a food processor). Add 1/4 cup milk and stir (and mash) vigorously until absorbed by the vegetables. Add 1/2-1 tablespoon butter and stir (and mash) until absorbed. Continue adding 1/4 cup milk and 1/2-1 tablespoon butter until puree is a cohesive texture and as rich and decadent as you desire. Sprinkle with sea salt and serve.

Links:


Feb 14, 2014

Fennel, Celeriac, Parsley and Red Onion Salad

I'm spoiled. I live in New York City, surrounded by wonderful supermarkets (I have three to choose from everyday, not to mention the two that I choose not to frequent because there are better options) and one to two Greenmarkets within walking distance as well as countless others a short subway ride away. I can get fresh vegetables (in and out of season) and, while I try to eat seasonally to keep costs down and quality up, I don't fret about it too much if one of us has a hankering for eggplant or tomatoes in the middle of February.

As for how this affects my cooking, unless we're having company over, I try not to buy too many ingredients for any one meal (another side of keeping costs and waste down). So I take for granted that I'll have flavorful ingredients that don't need much to make them vibrant and tasty.

But this salad brought all these facts starkly into relief. A simple winter salad, it's a delightful mix of fennel, celeriac and parsley, all tied together with a simple olive oil and lemon juice dressing and sprinkled with toasted pumpkin seeds. Sounds perfect, no? Well, it was good but neither my celeriac nor my fennel was anywhere near as flavorful as it should have been. So, while it was tasty, it wasn't fantastic. As the vegetarian put it, "The flavors are all good but they're so quiet!"

So why, you might ask, am I even sharing this with you? Because it is good. And it's a winter salad (which is exceedingly rare. And, if you make it with exceptionally fresh ingredients (like from a garden if you're lucky enough to have one), it will be phenomenal.

I'm entering this in Raw Foods Thursday on Gluten-Free Cat. Join us!

Fennel, Celery Root, Parsley and Red Onion Salad
adapted from the Washington Post

Preheat oven to 350 degrees. Toss pumpkin seeds with 1 tablespoon olive oil. Roast 6 minutes. Set aside and let cool.

In a large bowl, toss together celeriac, fennel, onion and parsley. Add oil, lemon juice, sea salt and pepper and mix well. Taste and adjust seasonings as needed.

Serve, sprinkling each portion with pumpkin seeds and avocado. Bon appetit!

Additions? If you want to add some protein, a can of tuna is a delicious addition. This also works nicely on a sandwich with some sliced turkey.

Drink? A glass of Riesling.

Links:

Sep 3, 2013

Green Beans with Heirloom Tomatoes, Shallots and Olives


Hello, Upper East Side! Believe it or not, the vegetarian and I have moved again -- this time to the Upper East Side. This is my first time living on the Upper East Side and, trepidatious as I first was, I'm now settling into my routines here and really enjoying myself. For the vegetarian, this is a homecoming of sorts -- his first apartment in NYC was only four blocks away from our current home. While a lot in the neighborhood has changed, much is also still the same and we've been having lots of fun discovering new places and rediscovering old ones.

My favorite new discovery thus far (surprise, surprise) has been the 82nd Street Greenmarket. Having grown up with the Union Square Greenmarket (and then spent time getting to know the various markets in Paris when I lived there), it's always been comforting for me to be able to walk to a market, talk to farmers and base my purchases on what's actually fresh and tasty and seasonal rather than whatever the supermarket managers decided to put on sale that week.

This Greenmarket is one of the best I've been to. It's mostly in a church courtyard but also spills out onto the surrounding sidewalk. Nowhere near as big as Union Square, I actually find it more manageable. There's fruit, vegetables, fish, goat (I got some goat merguez), baked goods (including some that are sugar-free and gluten-free!) and eggs. I went with a list and came home with two bulging bags -- including lots of surprises I wasn't planning on getting. Two things I was thrilled to get were green beans and heirloom tomatoes. This time of year, I can have tomatoes three times a day (and I often do) and they went wonderfully with the green beans. Alongside Mustard Greens with (Anchovy)-Garlic Dressing they were the stars of our Housewarming party. Bon appetit!

Green Beans with Heirloom Tomatoes, Shallots and Olives
adapted from Vegetable Literacy

Fill a large pot with water and bring it to a boil. While the water's boiling, prep your other ingredients: trim the tails (and tips, if necessary) from the beans. Stir the shallot together with the vinegar in a small bowl. Chop the olives and garlic together. Chop the tomato into small chunks.

Once the water comes to a boil, add 1 tablespoon salt along with the beans. Cook for 5 minutes. Drain and dry in a dish towel.

Put the beans into a large bowl and toss with olives and garlic. Add salt and pepper to taste. Drain shallots from vinegar, reserving both separately. Whisk olive oil into vinegar and pour over beans. Strew shallots on top, along with tomatoes and basil. Gently toss everything together. Serve room temperature. Enjoy!

Links:

Jun 18, 2013

Quick Sauteed Wild Mushrooms


Not surprisingly, the most difficult thing to get used to when adapting to eating animal proteins at every meal is how to still make a satisfying meal for the vegetarian without too many extra dishes and too much extra work. When we're both home early enough, the vegetarian helps, often making an extra starch for himself and/or baking a few veggie burgers alongside my protein of choice.

But many nights I'm alone in the kitchen, which I find surprisingly relaxing. Those nights, my movements are more fluid and I follow my recipes less closely. I cook more based on taste and smell and excitedly await when the vegetarian comes home and (hopefully) remarks on how delicious the house smells.

I'm sure not everyone would agree with this, but I think sauteed mushrooms (especially with lots of garlic and shallots) are a delicious smell. And they have enough substance to be a perfect meat substitute. Over quinoa linguine, they became the vegetarian's main dish. And a smaller portion alongside deviled eggs with anchovies was a perfect dinner for me. You could also up the protein by adding some crushed almonds on top of the mushrooms or (if you're cooking only for omnivores) mixing in some anchovies. Bon appetit!

Quick Sauteed Wild Mushrooms
(adapted from Whole Foods and Macrobiotic Cooking and Healing)

With a damp paper towel, clean mushroom caps. Remove woody stems from shiitakes and slice all the mushrooms thinly. Heat olive oil in a skillet over medium-high heat. Add shallots and cook 1 minute. Add mushrooms, stir frequently, and cook 8 minutes, until they become fragrant and begin to brown.

Add garlic and Innergy Biotic, increase heat to high and cook 2 minutes, until liquid all-but evaporates, stirring occasionally so as to ensure that nothing sticks to the bottom of the pan. Turn off heat, add thyme, salt and pepper and stir well. Serve, sprinkled with parsley. Enjoy!


Links:

May 6, 2013

Mushroom & Leek Bread Pudding

I spent my junior year of college abroad in Paris, France. For the first time, I was in charge of my own meals, cooking dinner around 5 nights a week. Much to my surprise, I started coming up with some wonderful creations and, wanting to remember the recipes, I started blogging. My blog was the now-defunct Noshes, Thoughts & Reves.

When the vegetarian and I started this blog, it was for several reasons. One was to bring us closer together, to create a way in which we could become excited about food together. It was also a way for me to share my own triumphs and tribulations of cooking mostly vegetarian with a wider audience. In the back of my mind, I think I imagined myself eventually becoming an occasional meat-eater myself, with virtually all my cooking becoming sustainable and vegetarian.

When I adopted the Body Ecology Diet, my food needs changed again and I adapted our diets to become gluten-free and sugar-free. At first, I made a point of making meat or fish several times a week but I slowly got tired of putting so much effort into a meal that only the two of us were eating and, mixed with all the reading I do about why vegetarianism is better, our kitchen produced more and more vegetarian meals.

Sadly, a year after starting the Body Ecology Diet I still have a compromised immune system and tire easily. Last month, I took the inevitable next step and consulted a holistic doctor. He explained that I'm suffering from adrenal fatigue, so I've been focusing more on being good to my body and resting. I'm also taking homeopathic supplements. I am continuing to avoid sugar and gluten, although I can now have sprouted grains. I can't have dairy, potatoes, peppers or eggplantAnd I have to eat animal protein at every meal.

So what has this meant for our home? I've started cooking fish and meat again. Not all kinds -- I'm avoiding pork, beef and processed meats -- but it's definitely been a change. We add veggie burgers for the vegetarian to many meals and share a vegetable dish. And I've been eating a lot of eggs. It's taken adjustments but so far it's fun. It means I have to plan meals farther in advance than I was wont to do. And I really miss cheese.

I made this bread pudding for our last dinner party. I adapted it from Ina Garten's Barefoot Contessa Foolproof and I think it's a keeper. We served it with Accidental Turkey and Ratatouille with Penne. Bon appetit!

Mushroom & Leek Bread Pudding
inspired by Barefoot Contessa Foolproof

Preheat oven to 350 F. Spread bread cubes out on a baking pan and bake 15 minutes. It's ok if they get a little browned. Set aside.

Meanwhile, over medium heat, heat oils in a large skillet. Add leeks and cook 8 minutes. Stir in mushrooms, basil, Cocobiotic, spice blend and pepper. Cook 10 minutes, stirring occasionally. Remove from heat and stir in parsley.

In a large bowl, whisk together eggs, coconut milk and chicken stock. Add bread cubes and mushrooms, stirring everything together. Push bread cubes down into liquid so they're as submerged as possible. Set aside for 30 minutes so bread can absorb the liquid. Pour into a 13 x 9 baking dish and bake 45 minutes until custard is set. Serve hot, warm or at room temperature.

Links:

Apr 12, 2013

Pan-Roasted Asparagus with Lemon and Garlic


Spring has sprung! Today was the first warm, sunny days in months that actually made me want to spend as much time as possible outside, soaking up the magnificent (and all-but forgotten) warm sunshine.

What do you crave in spring? I often think in terms of colors and I crave light green foods, especially asparagus. The first heralds of spring (often appearing in markets, as they did this year, when the month at the top of each calendar page is at odds with the weather outside), they help pull me out of my annual winter doldrums and remind me that this, too, shall pass and there will be wonderful warm days again when I can once more revel in our beautiful terrace, our personal oasis in the upper extremities of Manhattan that almost makes our commutes worthwhile.

But back to asparagus. While most people grew up blanching or boiling them, my family always roasted them in a hot oven until they became slightly caramelized. Delicious! But what about those days when your oven is otherwise occupied or you just don't feel like turning it on? That, my friends, is when you turn to pan-roasting.

I served these four times in the past three weeks: at our monthly cooking adventure, alongside Iranian Shrimp with Turmeric, Saffron, and Lemon Juice and Persian Dill and Lima Bean Rice; at both Passover seders (without the Parmesan cheese) and at an impromptu Game of Thrones gathering we hosted last weekend. And, while the vegetarian doesn't like asparagus, everyone else gobbled them up. They're wonderful warm or at room temperature and equally tasty with and without the parmesan cheese. Bon appetit!

Pan-Roasted Asparagus with Lemon and Garlic


Cook asparagus, olive oil, water and garlic in a large lidded pan over high heat, uncovered, for 2 minutes. Toss asparagus (tongs are the best for this), cover, and cook 1 minute. Remove lid, toss again, return lid and cook 5 minutes. Add lemon juice, toss again, season with salt and pepper and shave parmesan on top. Enjoy!

Links:

Mar 7, 2013

Crusty Spinach, Feta and Sun-Dried Tomato Bread Rolls

I know what you're thinking. Have I gone off my rocker? What happened to being gluten-free? That, dear readers, is the beauty of these rolls -- they are gluten-free. And sugar-free. But they don't taste it. The vegetarian's been heating them up for after-work snacks and every time I bite into one my first thought is: "I'm cheating; I'm so going to regret this." But of course I'm not. And I don't.

They're also my most successful venture into gluten-free (and yeast) baking to date! How can it contain yeast and still be sugar-free? The sun-dried tomatoes have enough sugar that the yeast feeds off of them without any sugar necessary! And a successful gluten-free free adaptation of a "normal" recipe that I had bookmarked but couldn't imagine being able to try. What recipe, you ask? This one from Sass & Veracity, a blog I happened to stumble upon while on my endless search on how to sneak more cooking greens (like spinach) into our diet.

And these fit the bill perfectly. Have them plain, as a snack, with a plate of Burrata & Tomatoes, an Asparagus Tortilla, Sungold Tomato & Cannellini Bean Dip or Watermelon, Feta and Arugula Salad. And of course a glass of Research Cab. Bon appetit!

Crusty Spinach, Feta and Sun-Dried Tomato Bread Rolls
adapted from Sass & Veracity

Pour two inches cold water into a pot and add spinach. Place heat on high and steam 5-10 minutes, until spinach is wilted. Remove and drain. When cool, wrap spinach in a clean dishtowel and ring out excess moisture. Set aside.

In a large bowl, stir together yeast, salt, spinach, feta and tomatoes. Place egg whites into a measuring cup and add lukewarm water until you have 3 cups of liquid. Stir into the spinach mixture. Add flour one cup at a time and stir gently with a wooden spoon just until combined. Cover bowl with a clean dishtowel and place in a cold, turned-off oven for 2 hours to rise (this is always the scary part for me!).

After dough has risen (phew!), prepare your baking pan: place a sheet of parchment paper on it and sprinkle with cornmeal. Now divide your dough into ten even-sized pieces. The dough will be a little sticky but easy to work with (at least mine was). If you need to, sprinkle with a little bit of extra flour. Roll (in your hands) into a ball, then place on your prepared baking pan. Repeat nine more times with the rest of the dough. Place in the oven for 30 minutes to rest.

Remove pan from oven and allow to rest an additional 30 minutes. Place a tray (I used a roasting dish) on the bottom rack of the oven and preheat to 450F.

After dough has rested sufficiently, dust the tops of the rolls with flour and snip an X into the top of each with clean kitchen scissors. Slide the baking pan with the dough into the oven, on an upper shelf. Fill up a measuring cup (or two) with VERY hot water -- as hot as your tap can get. Pour this water into the dish at the bottom of the oven. Close the door quickly (you're creating steam to help the rolls cook evenly. Bake 20 minutes. Cool before serving. Enjoy!

Links:

Mar 1, 2013

BED: Trout (or White Beans) with South Indian Spices


Is it March already? Doesn't February always disappear just when you've gotten comfortable with it? Or is that just me?

Anyway, I have a wonderful recipe to share with you today (complete with a vegetarian adaptation that uses the same spices) and, if you're making the trout component, an even more exciting cooking technique!

Back when I regularly cooked omnivore food, fish was one of my specialties. Fast and easy to cook, I could always adjust my seasonings to suit my mood. I realized this month, as I planned the menu for our monthly cooking adventure that I hadn't made fish in quite a while. So I resolved that it was time that changed. Wanting to combat the winter doldrums I've been in, I decided I wanted this fish to have a bite ... and lots of garlic. Interesting spices always make me think of Indian food so I went back to The 4-Hour Chef and adapted his recipe for Trout with South Indian Spices, including a wonderful Ginger-Garlic Paste made from scratch. (There's still more of the paste in our fridge -- any suggestions on how else we should use it?)


As for the vegetarian, he loves these flavorings as well, so, while I made the fish, I tossed a couple of cans of white beans with the same marinade ingredients and baked them in the same oven for the same amount of time. Formal directions are below. We also served this with basmati rice and gremolata and had an amazing whiskey butterscotch pudding for dessert. A Falanghina was a delicious accompaniment. à®®à®•ிà®´்ந்து உண்ணுà®™்கள் [bon appetit]!

Trout (or White Beans) with South Indian Spices
inspired by The 4-Hour Chef

Combine garlic, ginger and water in a cup or mixing bowl. Using your immersion blender, process until they've all combined into a smooth paste.

Combine 1 1/2 tablespoons ginger-garlic paste, vinegar, turmeric and salt in a bowl.

If making the fish, place it in a heavy ziploc plastic bag and add the marinade, massaging it well into the flesh. Marinate at least 8 hours.

If making the beans, add them to the bowl of seasonings, stir well and let sit for at least 15 minutes so marinade can permeate.

Preheat oven to 400F.

If making the fish: Remove it from the bag and place on a plate, flesh-side up. Now comes the fun part (I made the vegetarian stay in the other room while I did this): insert a skewer through the fish's mouth and rest its length along the fish's body. Balance 3 skewers along the width of a baking pan. Gently flip the fish over and rest its skewer on the other 3. Repeat with the second fish (and any others that you want to make; you may need to use more than one pan, depending on the size of your fish and your pans).

If making the beans: Place beans and marinade in a baking dish and stir well. I used a loaf pan.

Place beans and/or fish in the oven and bake 12 minutes. Serve with the lime juice drizzled on top. Enjoy!

Links: